
Here is the owl costume that I made previously, Lauren has sent me some photo's of her wearing it; in full costume with a mask. Seeing the costume being worn makes it look even better and the mask enhances it further!


|
|
|
Here is the owl costume that I made previously, Lauren has sent me some photo's of her wearing it; in full costume with a mask. Seeing the costume being worn makes it look even better and the mask enhances it further!
2 Comments
 A family member came to me with an idea of making an owl costume for a fancy dress costume, we researched online for a few ideas and here is what we came up with. This costume started out as a brown long sleeved jersey dress bought online. I started by making it shorter; I cut and re-hemmed the dress to the desired length.
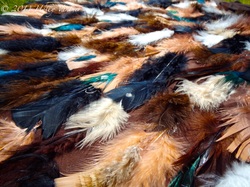
Now that it was the correct length, I measured the length from the end of the sleeve (at the wrist) down to the hem of the dress. From this measurement I made a pattern for the wings; below is a diagram of how to construct this: 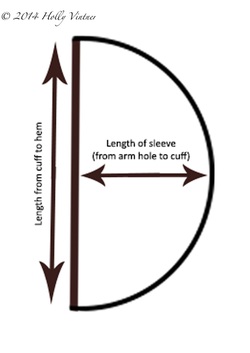 I made the two wings out of brown cotton, which matched the dress. I sewed each of these onto the side of the dress along from the cuff (end of the sleeve) down to the hem (bottom) of the dress. I also bought some `fun fur’ fabric, which I cut an oval out of for a fur patch on the front of the dress. This was top-stitched with a zig-zag stitch onto the front of the dress. Next came the fun task of gluing each individual feather on by hand! For some this would be tedious but I loved it! I started at the edges of the wings and glued a row on at a time – this was so that I could overlay each row to hide the top stalks of the feathers. I started by gluing on larger feathers (black, white, cream and brown) and I filled both wings with these. I had also bought some small delicate feathers to add a little colour and detail to the wings – I had speckled brown and blue feathers, which I stuck on over the top of the other feathers. I also used these to cover any small holes that I had missed or any glue that had been left exposed. I think in total I used 600-700 feathers!
To finish off the dress I have stuck feathers (both small and large) around the bottom of the front of the dress – this joins across the wings. I also stuck some feathers on the fur patch and on the front of the dress. I have left the back of the dress plain; this really gives the front the wow-factor! I love how the costume has turned out but it was quite expensive to make and is really heavy! It is a fantastic one off piece and will look spectacular at the party; I want one for myself now!
At the start of this project I was given the era 1850-1900, I started to gather images of clothing, accessories, household objects and prints from my era that I really liked, picking them for the colours or shapes that were used for each piece. From the clothing images I tried making samples of the techniques that were used, some of these included: smocking, embroidery and shearing. 
Next I decided on a print theme that I wanted to take further and explore in a modern way, so I chose the paisley print – I loved that the print had shapes inside shapes and thought that this could be really interesting on garments. I found images of the paisley from my era and also modern examples too. I started to draw some of my own paisley prints and developed these into embroidery samples and digital print. I then started playing with the paisley on the stand and seeing how it would fit onto the body. I really liked the shapes I was creating but still wanted to incorporate some of the Victorian dress shapes into my shirt too. 
Whilst researching I found images of knit and crochet from my era and some of the pieces were amazing, after learning to crochet during this project I really wanted to incorporate it into my work, I found some paisley patterns online and tried making them myself. I really liked the outcome of this and decided that this would be my main focus. I made 4 different styles of paisley using multiple colours. 
I was also given a shop to consider when designing my 34-piece collection, this was All Saints. I looked into the shop and put together a customer profile. I liked the shapes of the collection and some of the details that I thought made the All Saints brand I incorporated into my designs. I decided to change my colour scheme to fit in with the All Saints collection, as I couldn’t see any of their customers buying my bright paisley! 
After my initial designs I made my 34 pieces in illustrator as flat drawings, I found this hard as I hadn’t used the programme much before and learning how to use all of the tools was difficult! Once I had got the hang of it I really enjoyed putting my garments together and I was so pleased with the finished pages! I used colour to show my crochet garments so that they looked different to the others and added crochet samples next to each one. 
From these I put together my 6 outfits choosing my best pieces, I did my illustrations of these in Photoshop – I loved adding the colour and fabrics to these as it really brought my designs to life! I am very happy with the colour scheme that I have picked as I think it complements the garments and All Saints well. 
|
AuthorHolly Vintner. Graduated with a 1st class BA hons in Fashion from Plymouth College of Art. 
Archives
May 2015
Categories
All
|


 RSS Feed
